Clockwise: Salad mix (bagged), garlic chives, bell peppers, beets, kale, red kuri squash, watermelon

Did you know?
That watermelon’s have more lycopene per pound than fresh tomatoes? Lycopene is a powerful antioxidant that aids the body in fighting off free radicals. While fresh tomatoes are also an excellent source of lycopene, cooked tomatoes can have up to three times as much. All the more reason to eat watermelon now and jar/can our tomatoes for winter. 🙂


Frying Pan Turkey Meatballs

Happy Monday everyone!

So with the ridiculous amount of tomatoes that our plants keep gracing us with, we have been in mega sauce production mode. No sooner had I finished making a wicked large batch of spaghetti sauce, than we yielded another crop of tomatoes and I was left going, OK, more sauce! I wanted meatballs, but I try to reserve my “red meat moments” for my occasional steak. Turkey it was!

Ground turkey can be a hazard unto itself. Because there are not percentages of fat to meat ratio on a number of ground turkey products, you can actually end up eating something MORE unhealthy than an 80/20 ground beef. When buying turkey, look for lean or extra lean meat. I conveniently found a 99% to 1% ratio this time. It was really yummy. Also, you can opt to bake them, but with all of this heat I went for the skillet!

For my sauce recipe, see Kelyn’s Rainbow Tomato Sauce.  This incarnation was more of a roasted red pepper version.

Ingredients

1 lb “all natural” extra lean ground turkey
1 -2 teaspoons chopped, local, organic garlic
1TBSP Fennel seeds
1 extra large egg (from our ladies!)
1/2 cup bread crumbs (unseasoned)
1 tsp organic dry oregano
1 tsp organic dry basil
1 tsp organic dry rosemary
Sea Salt and 4-color pepper to taste
Organic Extra Virgin Olive Oil

1.) Add everything to a bowl. Mix it up with your hands until you can’t see the individual elements anymore.
2.) In a large frying pan, heat up enough oil to lightly cover the bottom of the pan over medium – medium high heat.
3.) While your oil heats up, roll your meatballs. I made them about an inch in diameter. If you try to roll them too hard, they can just fall to pieces. It is best to give a little roll between your palms, and then shape them into circles.
4.) When they are complete, gently place them in the pan. I usually try to “seal” 3 sides  of them, and then just toss them around in the pan every couple of minutes until they are brown on all sides. It took about 20-25 minutes I think (but honestly, I wasn’t hawk-eyeing the clock). I cut into one at about 15-20 minutes and saw that it wasn’t quite done. I let them go another 5 and they were good to go. Serve in sammies or atop your favorite pasta.

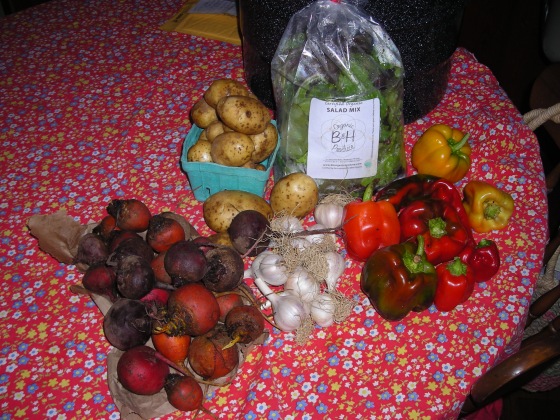
Potatoes, Salad Mix, Peppers, Garlic, and of course –  Beets!

Did you know?
Lots of groups like to highlight the best things to buy organically – as in the foods that are treated the most heavily with pesticides. I like to check on the “Dirty Dozen”, which I have listed below for 2012.  Click here for the full list of heavily treated crops.

These are ordered with #1 being the absolute worst. Hence, why I get peppers, lettuce and potatoes as much as possible in our CSA!

1.Apples
2. Celery
3. Sweet Bell Peppers
4.Peaches
5. Strawberries
6. Nectarines – Imported
7. Grapes
8. Spinach
9. Lettuce
10. Cucumbers
11.Blueberries – domestic
12.Potatoes

What’s Cooking Double Dose

Last week’s CSA shipment: Beets, 2 head of Romaine, Green Beans, Blackberries and Peppers

This week’s CSA box: Garlic, Hot Peppers, Swiss Chard, Beets, Peppers

Did you know?

That China is the garlic Czar of America? Most of our grocery store garlic comes from China, and lots of it has had contamination issues. With the option of local garlic, why go for Chinese garlic that has been shipped stored, and is pretty old by the time it gets to you? I guarantee if you even pick up one bulb of local (or even regional garlic) you will be surprised at the difference in flavor, texture and cooking quality. Above is a hardneck garlic that once every two weeks I peel, pop in the Cuisinart with a bit of Organic Olive Oil, and then jar for the next two weeks. It takes a bit of extra time, but the flavor is really out of this world!

So why do lots of grocers use Chinese garlic? Why else? It’s cheaper. Click here for a great NPR article that further discusses this issue.

Fiery Beet Salad

This past Saturday we had our CSA supper with B&H,  which I had been excited about since June. We had no Internet for a few days, and had been talking about how excited we were to go on Sunday… then we got the Internet back, checked our email ( at 3 PM on Saturday), and discovered that the dinner was in 3 hours! I needed something tasty and with speed! I had roasted another batch of beets to make pickled beets (Seriously, all summer production in small batches IS the way to go 🙂 ), and decided that I would attempt to make a beet salad for the masses. Eric, my fiance, is generally not a beet fan, but he went gaga for this spicy salad, and has eaten it 3 days in a row. I must have done something right!

Ingredients
6 large local, organic beets without stems or bottom “tails”
1 large, local organic carrot – shredded
2-3 local, organic cubanelle peppers – chopped
Spicy peppers of your choice (I used 3 hot wax peppers) – diced fine
6 TBSP  Extra Virgin Olive Oil
1 TBSP local, raw honey (I used Buckwheat)
1 tsp of lime juice (fresh would have been best – I was in a pinch though)
20-30 organic mint leaves (from our garden – I used apple mint)
1 bunch of local, organic cilantro
3 cloves of local, organic garlic – finely chopped
1 small ginger root (mine was the size of my thumb or smaller)
1/4 cup organic sesame seeds
sea salt
tri-color pepper

1.) Roast the beets at 350 degrees for about an hour. I paint them lightly with olive oil, put them on aluminum foil, and put a sheet of aluminum over them (making a beet pocket). They are ready when they are soft.
2.) Let the beets cool before peeling them. I peel by hand, but lots of folks use a paring knife because they don’t want pink hands. I have never had a problem with stained hands (cuticles a bit sometimes, but usually no).
3.) While your beets cook, or cool, mix your other ingredients in a bowl. I did liquid and spices first, then I added the carrots, garlic and peppers.
4.) When your beets are cooled, cut into little julienne strips. Add to mixture, stir, fridge, and eat whenever you like!

Almost Too Easy Bruschetta Grilled Chicken

This took me like, maybe 10 minutes to prep. SOOOO YUMMY!

Ingredients
4 small, local, organic chicken breasts
2 large, local, organic orange tomatoes (mine probably weighed 2 lbs together for perspective)
2 moderate to hot local, organic peppers – I used Czechoslovakian Black from our garden
15-20 small, organic, local basil leaves – I used variegated pesto basil from our garden
1 TBS local, organic garlic – chopped
4 TBS as fresh as you can get Parmesan, Asiago or Romano Cheese – I used a blend
Organic 4 color pepper
Sea Salt
Extra Virgin Olive Oil to taste

1.) Mix it all in a bowl. Let sit in the fridge to chill. Grill chicken. Top grilled chicken with summer bruschetta. Done and done!

How’s that for simple! 🙂 Mine is pictured with Yukon Gold mash with dill and sautéed Swiss Chard.

Kelyn’s Rainbow Tomato Sauce

Ravioli with home-made sauce and dill butter garlic beans.

Sometimes in life, we just have to say I am sorry. I am SO SORRY that this recipe is late to the blog! I promised it to a few lovely patrons of the West Reading Farmer’s Market by 9 PM last evening, but alas, wedding decorating took over our home, and then my mother-in-law to be dropped off the first official bouquet of garden grown flower lovin’ for the wedding (next August), and to be honest, by the time I settled down, I was ready for sleepy-time. 🙂

With no further delay, here is the recipe for the best tomato sauce you will ever eat. I am a fan of tasting the vegetables, not overwhelming them with unnecessary seasoning. We just kept saying all of Saturday night, “Why isn’t there more!?!?!?”, and milling around the house like lost children, opening cupboards and expecting that maybe I somehow jarred some in my sleep. I hope you enjoy this simple and healthy recipe as much as I do.

Ingredients

The mix of veggies in the pot, pre-cooking.

1 quart mixed color heirloom, organic, local tomatoes (mine were largely yellow and orange, with a few red and purple)
1 large, local, organic carrot (mine was purple!!!)
1 small, local, organic sweet onion
1 large, local, green bell pepper (or 2 small ones)
1 extremely hot, local, organic hot pepper (adjust to your desired level)
1/2 a bunch of local, organic, basil – I used spicy bush, sweet Italian, and purple
6-8 cloves of local, organic garlic
Organic Extra Virgin Olive Oil

1. Cut all of the tomatoes into chunks. Everything will eventually go through a food processor or blender, so large sloppy chunks are AOK. You can also “Hulk Smash” with your hands, if you prefer. Put into a large sauce pot.
2. Chop up onion, carrot, peppers, basil and garlic. Add to the sauce pot. Drizzle with a bit of oil. Simmer over medium-ish heat for 25-30 minutes, stirring occasionally. I like the fresh taste of the veggies, so I don’t simmer more than 30 minutes.   Once your skins on your tomatoes start to get wilty and weird, you are ready.
3. Remove from heat. If you are fearless like I am, you just pour this steaming hot pile of awesome directly into the food processor -otherwise let it cool for a few minutes. I use my Cuisinart on high for maybe 30 seconds, so that there are still some pieces of veg, but the food processor/blender is the trick to thickening it up. Check every 15 seconds until you hit your desired texture. IF YOU DO THIS HOT – BE CAREFUL! The steam can cause burns.
4. Serve over your favorite pasta with fresh grated Parmesan cheese. We ate it over cheese ravioli, and then I steamed green beans and added a garlic, dill butter that I like to make and keep around. I find that this needs no salt, but I also don’t eat very much processed food, and thereby which, find a lot of things to be too salty. Feel free to add some sea salt if needed!

Shocking Tomatoes

Some of our tomatoes

With our garden absolutely teeming with almost there ‘maters, it is about that time to start canning sauces, salsa and other tasty treats. One of my favorite additions to a salad are shocked tomatoes, marinated in a tasty vinaigrette. This is essentially just the first steps of making concasse, with a different end result. You can use any vinaigrette that you really like, but my two favorites are champagne or pomegranate.  This is an especially effective way to use your unsightly tomatoes. Once the skin is off and they are marinated, they’re all equally beautiful and yummy.

Ingredients
1 pint local, organic cherry tomatoes
1 bottle of your favorite organic vinaigrette, or if you are feeling bold, you could try this recipe for Champagne Vinaigrette from epicurious.

1. Cut the stem out of all tomatoes, and cut a small to medium “X” in the bottom of each of them. This is necessary to make it easy to remove the skin later. If your tomatoes have odd spots that you aren’t certain about, it is ok to cut those out as well.
2.  Bring a pot of water to a boil. Fill a large bowl with really icy ice water, and set aside. Once the pot of water is boiling, slide your tomatoes into it – gently but quickly.
3. Cook the tomatoes for no more than 1 minute. This is called blanching. It loosens the skin and makes it easy to peel off. If you are only doing a small amount, say a pint of cherry tomatoes, then it is probably going to take 30 seconds max. Your cue is when the skin around the “X” you cut starts to peel back and separate. As soon as this happens,  you are ready to transfer to ice water.
4. Put a lid over the pot and hold it over the sink to drain the water out (you can also use a colander, just be careful), then drop the tomatoes into the ice water, “shocking” them into not cooking anymore.
5. Once the tomatoes have cooled (a few minutes max  – leaving them in gives them the bloat), pull them from the ice water. Now it will be easy to peel their skin off (and compost or feed to chickens) where you cut your “X”.
6. Once skinned, place in a small bowl. Cover your tomatoes with vinaigrette until they are completely submerged in it. Refrigerate. You can eat them within an hour, but personally, I think they are better the next day. Eat as a snack, add to a salad,  or serve with other finger foods.

I’ve been making these for 6 or 7 years now, and every time people eat them, they are tickled pink. A nice, easy, healthy treat!

The Fine Art of the Menu

My perception of home cooking has changed a lot since I was a child. When I hear the term “home cooking”, I still get the instant flash of a Donna Reed type in a red and white checkered apron over a crinoline skirt, pearls reflecting soft dining room light as she serves her perfectly cooked roast with a sparkly *ting* on her toothy smile.

If you asked that woman on a Sunday what she was making for dinner the next Thursday, she would likely have an answer. These women still exist, they are my fiance’s mother – who would know how to answer that question, and does serve dinner with a smile (just in modern clothes and less sexism swirling in the air) nightly.

My generation, however, is more non-committal, more flexible and spontaneous. If you ask us what is for dinner on Thursday we probably have no idea. Or a generic response like “something good”. We are the quick fix society that our parents and grandparents have ushered us into with processed fast foods – starting with the TV dinner. We are the end of the red checkered apron string.

In an effort to modernize the theory of planing your meals for the week, I present a fun and more accommodating option for the modern society person who wants to both save time and create tasty meals with produce/be a part of a CSA/try new things. Make a weekly or bi weekly menu. Sit down on the day you get your CSA/visit your local market, and let your imagination go nuts with the bounties of your harvest.

Type it up and print it out, or write in on the note pad on the fridge. My menus are composed of the same categories every time: Breakfast, Lunch, Meat, Vegetarian, From the Sea and Sides. I keep a running word document, so that the standards always remain (red beans and rice, vegetarian burritos, omelets, pesto etc.) on the list, and I just update the things I don’t replenish or replace. I print bi-weekly and just cross things out as they become non-options. Trouble with ideas? Google your ingredients and get inspired. Make 3 different recipes for the salmon you have so that when you look at your menu, you get the fun of choosing like you would at a restaurant. It allows you preparedness with flexibility – a modern touch for the non-committal or spontaneous chef.

My fiance will tell you he is spoiled for this, which maybe he is, but I see it is a practical way to know what you are eating for the week. I come home from work, I don’t feel like thinking about cooking – I just want to cook. I pass the menu off, he narrows to the things that sound good, and boom I am in the kitchen and ready to go – a.k.a. Kelyn’s fast food. No time squandered on a week night, decision made, tasty home cooked food on the table with speed – hold the crinoline and pearls.


Scrambled Eggs with Kale & Hash Browns

Kale for breakfast? I think so!  This is a super fast & super easy recipe.

I was beyond skeptical, but Eric was pacing around like a caged animal while it cooked, telling me every time he set foot in the kitchen that, “I can’t stay out here. This smell is making me crazy. It smells soooo good!” So I present to your taste-buds – Kale & Eggs with Hash Browns!

Ingredients (for 2 people)
4-5 large, organic, local, kale leaves – washed and ripped into pieces – NO STEMS! (I used curly kale, and liked it for it’s unique texture with the eggs)
6 free range, vegetarian diet eggs
2 average sized organic, local carrots – sliced thin
2-3 organic, local chives – chopped
2 organic, local garlic scapes (or 1 tsp organic garlic) – sliced thin
4 slices Heidi Ann Swiss Cheese  – a low-fat cheese that my grandma got me hooked on!
2 local, organic potatoes (I used Yukon Gold – I CANNOT GET ENOUGH OF THESE!)
1/2 of a small, organic, local sweet onion (I used Pontiac) – chopped
1-2 TBSP Earth Balance (non GMO – yay!)
Organic Extra Virgin Olive Oil

1.) Put a small amount of oil in a pan. Put rinsed (but not dried!) and ripped up kale in the pan with everything but the eggs, onion and cheese. Cover, and cook on medium low heat for 15 or so minutes. Kale with be wilty and resemble cooked spinach. If you aren’t sure if it is done, try it! Most of my curls were gone by the time it had simmered down.
2.) While your veggies are cooking, in a separate pan, melt 1 TBSP of Earth Balance and add your onion. I hold my shredder over the pan, and shred the potatoes directly into it. Once all shredded, crank the heat up to medium high. If you keep it too low, they will not brown. Cook about 5-7 minutes on each side, flip when browned. When you flip, you may need that extra Earth Balance to keep them from sticking. I just put a bit on top of them, and it usually melts down and does the job.
3.) When your kale is cooked, which should be around here, plate it. I poured the little bit of leftover fluid  from the kale into my hash brown pan in an attempt to keep those vitamins in my food – who knows if it works. I then used the kale pan for my scrambled eggs. Prep your pan with a  little olive oil, and put it back on the burner over medium low heat.
4.) Beat your eggs up until no whites/yellows remain. My mom whips the heck out of them, and makes the best scrambled eggs I ‘ve ever had, so these egg tricks are hers. If I think it is enough, I usually will go for another minute after that point to get them “mom passable”. If you prefer salt and pepper, add that now.
5.) Pour eggs into your warmed pan with oil. Move them slowly with a spatula for the first 2 or so minutes. Again, a mom trick. Once they get some form, leave go for a bit. Cook until mostly solid with a little bit of runny. The lower heat on these helps to get them to just the right state of being to add the kale mix. You will likely be flipping your has browns somewhere in here.
6.) Once the eggs are a bit shiny with goo, but mostly cooked, add the kale. Mix and cook for another minute. Top with 4 slices of Heidi Ann Swiss and cover it all. Cook 1-2 minutes until cheese melts.
7.)Everything timed out just right for me that I got to plate eggs and hash browns at the same time. We topped our hash browns with organic ketchup, and eggs with hot sauce. Yum!

Create a free website or blog at WordPress.com.