Aye Chihuahua Mexican Bake

Called “Aye Chihuahua” because if you use enough hot peppers it will get your brow sweating and your sinuses cleared. “Necessity is the mother of invention,” says Plato, and he is right. Tons of hot peppers, garlic and tomatoes necessitate a delicious mouth fiesta.

Ingredients

Stuffing
1 pound extra lean ground beef (grass-fed and local if you can)
1 small local, organic sweet onion – chopped
3-5 local, organic garlic scapes – chopped
1 can organic red beans
1 can organic black beans
1 large local, organic yellow carrot – sliced (but if I do this again, I will shred it)
1 cup local, organic corn
1-3 local, organic hot peppers (depends on how much heat you like – we like a lot! )
2 cups of shredded reduced fat cheese (We used Monterey Jack)
Extra Virgin Olive Oil
8 flour tortillas

Topping
1 pint local, organic cherry tomatoes
a handful of fresh, local cilantro (OK, so admittedly I didn’t have this and copped out with 4 Tbsp dry, organic cilantro)
2 heaping Tbsp local, organic garlic – chopped
a pinch of sea salt
Organic Blue Cheese dressing, steak sauce or ranch (100% optional)

1.) Preheat your oven to 350. Brown your ground beef and onions in a pan on medium heat. In another saute pan, combine your beans and veggies with some oil, and saute over medium heat, stirring occasionally.
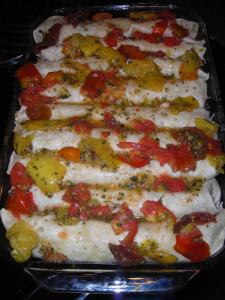
2.) Once everything is cooked, you can start rolling your wraps. I drain the burger grease, and then combine everything in my large saute pan that the burger cooked in. I put a sprinkle of cheese into the tortilla, scoop a spatula full of the innards into it, and then roll it up to be skinny and tight. Place in a 9×13 glass baking dish. Divide the contents into 8 tortillas (there are 9 in mine, since we had a rogue extra in the fridge).
4.) Once all are rolled up, you can start your topping. In a side dish hand squash your tomatoes. This is my favorite thing about tomatoes. (If you have never crushed one with your bare hands, take a moment to feel like the Hulk and mush the crap out of it. I was once told to rip pages out of a phone book when you are mad – like a kinkajou I suppose. Forget that. I squash maters and cry “Hulk Smash”.) Add your cilantro, salt and garlic. Stir thoroughly.
5.) When your topping is ready, cover your tortillas with it. Cover the whole shebang with foil, and bake for 30-40 minutes.

Serve with sauce if you like. I had one plain, and one with salsa (both were great), and then Eric introduced me to blue cheese and steak sauce on a bite, which was pretty much a little bastardized gift of Mex-American heaven.

Warning: They are addictive and filling. Get ready for a food coma and siesta afterwards!

Pasta Primavara Bake

As any good American citizen, sometime I just need to be able to come home and make something healthy and super quick for dinner. While there are hundreds of variations of pasta primavera, this one is my favorite for a quick fix.

Ingredients

1 box veggie pasta
1 jar organic Alfredo sauce (Newman’s is good, and relatively easy to find)
8 oz. Ricotta Cheese
1 organic, local zucchini – sliced into 1/8 inch pieces, cut in half again
3 organic, local carrots – cut into medium slices
1 cup local, organic peas
1 small head local, organic broccoli – steamed (or microwaved…gasp!)
handful of organic, local basil (I used Sweet Italian and Pesto Basil)
A shake or two of organic red pepper flakes
2-3 Tbsp organic, local garlic -chopped
1/4 cup breadcrumbs
Organic garlic granules
Extra Virgin Olive Oil

1.) Preheat your oven to 350. Boil your water for your noodles, and cook them as you complete the following steps.
2.)Heat oil  in a large saute pan over medium heat. Add all vegetables (except for the steamed broccoli), garlic, red pepper & basil and saute for 5-7 minutes, until zucchini gets to a slightly wobbly point.
3.) Pour sauce into a 13 x9 glass baking dish. Add steamed broccoli. I usually add 1/4 cup warm water for baked pasta dishes, so that they stay moist – this is optional.  When the pasta finishes, drain and add to baking dish. When the veggies finish, add to baking dish as well. Mix it all together.
4.) Top with small spoonfuls of ricotta  and sprinkle with bread crumbs and garlic granules. Bake at 350 for 15-20 minutes.

Serve with garlic bread – nom nom nom!

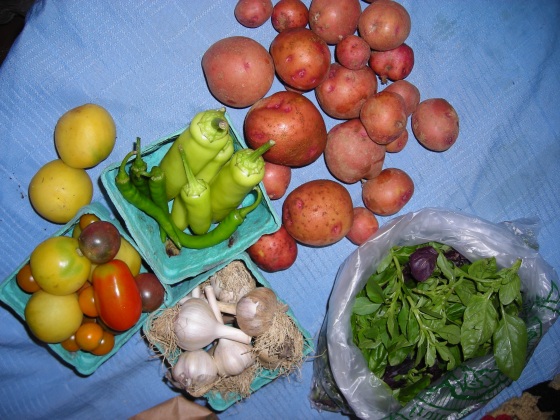
Clockwise from garlic – garlic, tomatoes, Hungarian wax peppers, red gold potatoes, bag o basil


Did you know that the inside of purple carrots (see last weeks “What’s Cooking Wednesdays”) is actually not purple? 🙂

Purple carrots

Shocking Tomatoes

Some of our tomatoes

With our garden absolutely teeming with almost there ‘maters, it is about that time to start canning sauces, salsa and other tasty treats. One of my favorite additions to a salad are shocked tomatoes, marinated in a tasty vinaigrette. This is essentially just the first steps of making concasse, with a different end result. You can use any vinaigrette that you really like, but my two favorites are champagne or pomegranate.  This is an especially effective way to use your unsightly tomatoes. Once the skin is off and they are marinated, they’re all equally beautiful and yummy.

Ingredients
1 pint local, organic cherry tomatoes
1 bottle of your favorite organic vinaigrette, or if you are feeling bold, you could try this recipe for Champagne Vinaigrette from epicurious.

1. Cut the stem out of all tomatoes, and cut a small to medium “X” in the bottom of each of them. This is necessary to make it easy to remove the skin later. If your tomatoes have odd spots that you aren’t certain about, it is ok to cut those out as well.
2.  Bring a pot of water to a boil. Fill a large bowl with really icy ice water, and set aside. Once the pot of water is boiling, slide your tomatoes into it – gently but quickly.
3. Cook the tomatoes for no more than 1 minute. This is called blanching. It loosens the skin and makes it easy to peel off. If you are only doing a small amount, say a pint of cherry tomatoes, then it is probably going to take 30 seconds max. Your cue is when the skin around the “X” you cut starts to peel back and separate. As soon as this happens,  you are ready to transfer to ice water.
4. Put a lid over the pot and hold it over the sink to drain the water out (you can also use a colander, just be careful), then drop the tomatoes into the ice water, “shocking” them into not cooking anymore.
5. Once the tomatoes have cooled (a few minutes max  – leaving them in gives them the bloat), pull them from the ice water. Now it will be easy to peel their skin off (and compost or feed to chickens) where you cut your “X”.
6. Once skinned, place in a small bowl. Cover your tomatoes with vinaigrette until they are completely submerged in it. Refrigerate. You can eat them within an hour, but personally, I think they are better the next day. Eat as a snack, add to a salad,  or serve with other finger foods.

I’ve been making these for 6 or 7 years now, and every time people eat them, they are tickled pink. A nice, easy, healthy treat!

This weeks bounty includes some beasty carrots, garlic, swiss chard, fresh cut flowers, and green beans!

The Fine Art of the Menu

My perception of home cooking has changed a lot since I was a child. When I hear the term “home cooking”, I still get the instant flash of a Donna Reed type in a red and white checkered apron over a crinoline skirt, pearls reflecting soft dining room light as she serves her perfectly cooked roast with a sparkly *ting* on her toothy smile.
If you asked that woman on a Sunday what she was making for dinner the next Thursday, she would likely have an answer. These women still exist, they are my fiance’s mother – who would know how to answer that question, and does serve dinner with a smile (just in modern clothes and less sexism swirling in the air) nightly.

My generation, however, is more non-committal, more flexible and spontaneous. If you ask us what is for dinner on Thursday we probably have no idea. Or a generic response like “something good”. We are the quick fix society that our parents and grandparents have ushered us into with processed fast foods – starting with the TV dinner. We are the end of the red checkered apron string.

In an effort to modernize the theory of planing your meals for the week, I present a fun and more accommodating option for the modern society person who wants to both save time and create tasty meals with produce/be a part of a CSA/try new things. Make a weekly or bi weekly menu. Sit down on the day you get your CSA/visit your local market, and let your imagination go nuts with the bounties of your harvest.

Type it up and print it out, or write in on the note pad on the fridge. My menus are composed of the same categories every time: Breakfast, Lunch, Meat, Vegetarian, From the Sea and Sides. I keep a running word document, so that the standards always remain (red beans and rice, vegetarian burritos, omelets, pesto etc.) on the list, and I just update the things I don’t replenish or replace. I print bi-weekly and just cross things out as they become non-options. Trouble with ideas? Google your ingredients and get inspired. Make 3 different recipes for the salmon you have so that when you look at your menu, you get the fun of choosing like you would at a restaurant. It allows you preparedness with flexibility – a modern touch for the non-committal or spontaneous chef.

My fiance will tell you he is spoiled for this, which maybe he is, but I see it is a practical way to know what you are eating for the week. I come home from work, I don’t feel like thinking about cooking – I just want to cook. I pass the menu off, he narrows to the things that sound good, and boom I am in the kitchen and ready to go – a.k.a. Kelyn’s fast food. No time squandered on a week night, decision made, tasty home cooked food on the table with speed – hold the crinoline and pearls.


“I’m tired of people saying you can’t afford organic food. You know what you really can’t afford? Cancer.” – Patron of the West Reading Farmer’s Market

Pickled Beets – My New Obsession

When I was growing up, I hated beets. I hated them until I was 24 because I had never actually tried one, and just instinctively put up that wall that we so easily and unnecessarily put up when we are considering new food options. One random day at a salad bar, I tossed a beet on my plate. I was overwhelmed when I ate it! It was earthy and rooty and sweet and tart. What a delightful find!

Fast forward to the beginning of the CSA. I wanted beets. I would pickle them and store their goodness forever. Though having canned salsa, jam, and other various things in the past, I had never tried beets. I write this blog to show that it is easier than you think to make tasty, organic food, and to promote it in South Eastern Pennsylvania. Though all of the recipes thus far have been my own creation, for something like pickled beets I wanted the expert word. That being said, see the link at the bottom of the page for the pickling recipe I have been using.

When I sell beets at the Farmer’s Market there are 2 things most people don’t seem to know.

1.) Beet Greens are delicious mixed in with salad mix, and they’re healthy for you, packed with a wallop of vitamins A & K, potassium and magnesium (among other things). They come from the chard family, and are quite tasty.

2.) People like pickled beets, but few people actually know how to pickle them.

That’s when I discovered this recipe.  In my experience with cooking, I try really hard to NOT boil any veggies. Boiling kills their vitamin and nutrient content, and all of the good stuff leeches into your water (which you then throw away). When boiling vegetables, they lose a lot of their value. That being said, I roast the beets instead of boiling them.

Again, this is not my recipe. Click the link to check out the full directions from What’s Cooking America.  They offer boiling or roasting as a method, and roasting is healthier!

Ingredients:

3 pounds fresh small whole beets (use similar size beets)*
2 cups organic apple cider vinegar
2 cups water
2 cups granulated, organic sugar
3 or 4 local, organic garlic cloves, sliced in half

* Small beets can be pickled whole. Larger beets can be sliced in 1/4-inch slices or diced. In this recipe, I used several different varieties of beets that were varying sizes that I sliced.

Now before I start feeling like Dwight Schrute from “The Office” I will get off my beet pedestal.


Scrambled Eggs with Kale & Hash Browns

Kale for breakfast? I think so!  This is a super fast & super easy recipe.

I was beyond skeptical, but Eric was pacing around like a caged animal while it cooked, telling me every time he set foot in the kitchen that, “I can’t stay out here. This smell is making me crazy. It smells soooo good!” So I present to your taste-buds – Kale & Eggs with Hash Browns!

Ingredients (for 2 people)
4-5 large, organic, local, kale leaves – washed and ripped into pieces – NO STEMS! (I used curly kale, and liked it for it’s unique texture with the eggs)
6 free range, vegetarian diet eggs
2 average sized organic, local carrots – sliced thin
2-3 organic, local chives – chopped
2 organic, local garlic scapes (or 1 tsp organic garlic) – sliced thin
4 slices Heidi Ann Swiss Cheese  – a low-fat cheese that my grandma got me hooked on!
2 local, organic potatoes (I used Yukon Gold – I CANNOT GET ENOUGH OF THESE!)
1/2 of a small, organic, local sweet onion (I used Pontiac) – chopped
1-2 TBSP Earth Balance (non GMO – yay!)
Organic Extra Virgin Olive Oil

1.) Put a small amount of oil in a pan. Put rinsed (but not dried!) and ripped up kale in the pan with everything but the eggs, onion and cheese. Cover, and cook on medium low heat for 15 or so minutes. Kale with be wilty and resemble cooked spinach. If you aren’t sure if it is done, try it! Most of my curls were gone by the time it had simmered down.
2.) While your veggies are cooking, in a separate pan, melt 1 TBSP of Earth Balance and add your onion. I hold my shredder over the pan, and shred the potatoes directly into it. Once all shredded, crank the heat up to medium high. If you keep it too low, they will not brown. Cook about 5-7 minutes on each side, flip when browned. When you flip, you may need that extra Earth Balance to keep them from sticking. I just put a bit on top of them, and it usually melts down and does the job.
3.) When your kale is cooked, which should be around here, plate it. I poured the little bit of leftover fluid  from the kale into my hash brown pan in an attempt to keep those vitamins in my food – who knows if it works. I then used the kale pan for my scrambled eggs. Prep your pan with a  little olive oil, and put it back on the burner over medium low heat.
4.) Beat your eggs up until no whites/yellows remain. My mom whips the heck out of them, and makes the best scrambled eggs I ‘ve ever had, so these egg tricks are hers. If I think it is enough, I usually will go for another minute after that point to get them “mom passable”. If you prefer salt and pepper, add that now.
5.) Pour eggs into your warmed pan with oil. Move them slowly with a spatula for the first 2 or so minutes. Again, a mom trick. Once they get some form, leave go for a bit. Cook until mostly solid with a little bit of runny. The lower heat on these helps to get them to just the right state of being to add the kale mix. You will likely be flipping your has browns somewhere in here.
6.) Once the eggs are a bit shiny with goo, but mostly cooked, add the kale. Mix and cook for another minute. Top with 4 slices of Heidi Ann Swiss and cover it all. Cook 1-2 minutes until cheese melts.
7.)Everything timed out just right for me that I got to plate eggs and hash browns at the same time. We topped our hash browns with organic ketchup, and eggs with hot sauce. Yum!

Seeing Green Peanut Noodles

With all of the yummy greens in the fridge, it’s been hard to even begin where to plan meals. The other day we made sandwiches, and when we sat down to eat, Eric said “Man, what’s wrong with this lettuce? Why is it so hard?” I took the piece of lettuce from him to discover he had pulled a leaf from the cabbage bag for his turkey sandwich. Something drastic had to happen! I had to catch up with our produce before we hit attack of the killer cabbage mode.

Veggie stir-fry


Ingredients
1 box of pasta, cooked. I wanted Udon noodles, but made do with spaghetti.

Stir Fry
1 small head of local, organic cabbage
3 cups local, organic arugula
3 local, organic carrots thinly sliced
1 head local organic tat soi
1 bunch local, organic Swiss Chard
1 small, local, organic onion in large slivers
6 cloves local, organic garlic, chopped
3 Tbsp Organic Extra Virgin Olive Oil
1/2 cup white wine (I used home-made Gewürztraminer)

Peanut Sauce
5 Tbsp all natural peanut butter
1 cup hot water
8-10 large basil leaves from our garden
1 tsp organic  yellow curry
2 tsp organic sugar
a healthy squeeze of siracha
3 Tbsp Organic Extra Virgin Olive Oil

Topping
Sesame Seeds
1 local, organic carrot shredded
2 local, organic garlic scapes cut into thin slivers
Soy Sauce to taste (optional)

1.) Tear the cabbage, arugula, tat soi and Swiss chard into large pieces. Wash greens thoroughly in a colander.  Shake off excess water and transfer to a large wok.
2.) Add onion, carrot, garlic, oil and wine to wok. Simmer over medium low heat, covered for 10-15 minutes. Stir occasionally.
3.) In a separate small sauce pan, on low heat, combine all peanut sauce ingredients. Stir occasionally.
4.) While everything is cooking, prep the topping of sesame seeds, carrot and scapes tossed in a bowl.
5.) Pour the pasta into a 9×13 baking dish. If it is sticking together, add a bit of oil to spread it about.
6.) Add peanut sauce to wok, and incorporate into vegetables. It is OK if there is a bit of residual liquid in the wok, it is full of vitamins and will mix with the sauce.
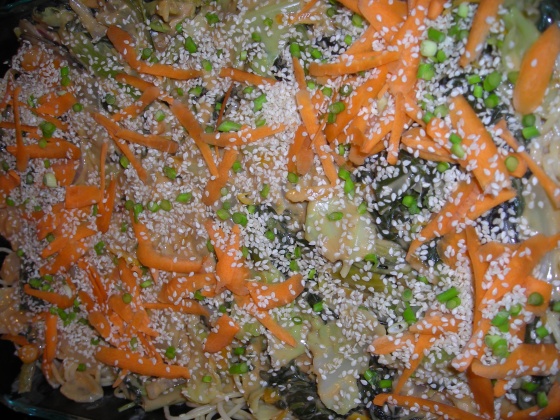
7. Pour wok contents over pasta in the casserole dish. Sprinkle dry topping on the top. Serve with soy sauce on the side.Serves 4 - 6 people

Create a free website or blog at WordPress.com.